There are several options to enroll vendors. Each option is designed to ease your vendor enrollment process and remove as many manual processes as possible. See below for all possible options:
- Enroll Vendors Using Vendor Import
- Auto-Enroll Vendors on the PS20
- Auto-Enroll Vendors Using Mastercard Clearing Data
- Enroll Vendors Using Cash Requirements Reports
- Enroll Vendors Using VEWS
- Enroll Vendors Using Comdata’s Export Sync Tool
Enroll Vendors Using Vendor Import
The most common method for enrolling your vendors is by providing your Vendor Enrollment Specialist a Vendor Master file in Excel spreadsheet format. As mentioned in Submitting a Comdata Master Vendor File, the steps are as follows:
- Comdata will ask for a list of your current vendors in Excel spreadsheet format.
- We check your list against Comdata’s vendor database to identify Mastercard-accepting vendors.
- Mastercard-accepting vendors and vendors who have accepted virtual payments through another customer are auto-enrolled.
- Comdata’s Vendor Enrollment Team (VET) will place your vendors in prospect categories to identify campaign strategies.
- If you approve, the VET will reach out to these vendors for enrollment.
- The VET will continuously campaign to every new vendor added to your business. Ensure you send an update vendor list to Comdata regularly (weekly, monthly, or quarterly).
Auto-Enroll Vendors on the PS20
When sending a PS20, you can use certain fields to auto-enroll the vendor you’re paying into the Virtual Payments program. This is very beneficial if you’re trying to do your own vendor enrollment, instead of using the Vendor Enrollment Team.
In order to use the PS20’s auto-enroll function, the following fields must be completed:
- Supplier Address Line 1
- Supplier Zip Code
- Supplier State
- Supplier City
- Supplier Phone Number
The fields above are indicated as P (preferred) in the PS20 layout, as they are required for auto-enrollment. If you use these fields, it is required that the values entered be accurate.
Once the PS20 is submitted, a Comdata match process will occur to determine if the vendor exists in Comdata’s master vendor database. If the vendor exists, they will be enrolled into your program if they’re status is anything other than Enrolled. If not, a new vendor record will be created in the database and they will be enrolled into your program.
Auto-Enroll Vendors using Mastercard Clearing Data
As part of vendor enrollment, Comdata offers you the ability to auto-enroll vendors without sending enrollment notification to Comdata. When a vendor accepts a Comdata Mastercard payment outside of a virtual card, clearing data is clearing data is created (data exchanged between the processor and issuer containing the vendor’s information). When a PS16, PS20, or web service file is submitted, Comdata collects the MCC (Merchant Category Code), address, and Federal tax ID from the vendor and uses this information in the normal match process. If a match is found, the vendor is auto-enrolled or identified as a Known Acceptor (K).
Note that the Known Acceptor status is for vendors created from the clearing data without an email address. When a vendor is identified as a Known Acceptor and sent through Comdata’s back-office systems, our Vendor Enrollment team will know the vendor accepts virtual cards, but an email address has yet to be obtained.
Enroll Vendors by Using the Cash Requirements Reports
Comdata allows you to send in your vendor invoice data using a Cash Requirement report (or any file that contains pending vendor payments). You can send these files using Comdata’s File Transfer Protocol (FTP) website, known as IBM Sterling File Gateway. Our back-end systems will scan the report and identify vendors who have payments due within a week and are being paid by a method other than virtual cards.
The vendors with pending payments will be enrolled in Comdata’s systems as Pending. Then, Comdata’s Vendor Enrollment team will campaign to those vendors and offer virtual card as a preferred payment method. If the vendor accepts, they are automatically enrolled and can actively accept virtual card payments.
This feature allows you to manually submit vendor records, alleviating the need to constantly send in updated vendor master files.
- Exclusion rules allow you to exclude any vendors with specific values in the report. For example, if a report is submitted with the value 1234 for the Vendor Number, you can set the system to exclude the vendor record.
- Transformation rules allow you to replace a value in a vendor record with another value. For example, if Joe’s Flowers is entered as the Vendor Name, you can set the system to replace that text with Joseph’s Flowers. Contact your Comdata Technical Relations Representative (TRR) to set up filter rules.
1. Using the data in your Cash Requirements report, create a CP00001 file. This file is similar to the Vendor Import File, but contains additional fields at the end for adding miscellaneous data.
However, if you are unable to submit a single file, you can submit your vendor data in two separate files: CP00002 (vendor data) and CP00003 (invoice data). Comdata’s back-end systems will merge the CP0002 and CP0003 into a CP00001. For file layouts, contact your TRR.
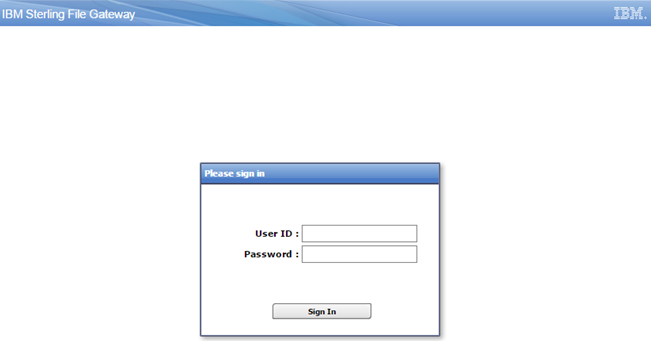
2. Access the Sterling File Gateway website at: http://transfer.comdata.com:50072/myfilegateway
3. Enter the user ID and password provided to you by your TRR. Then, click Sign In.
4. The Sterling File Gateway home page provides options for you to upload, pick up, or track files.
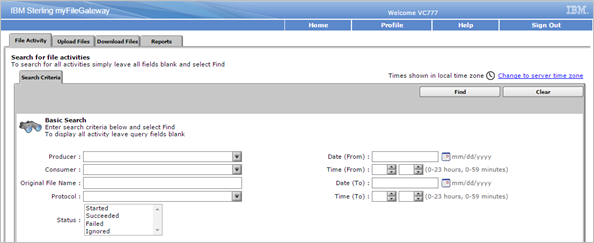
5. On the home page, click the Upload Files tab.
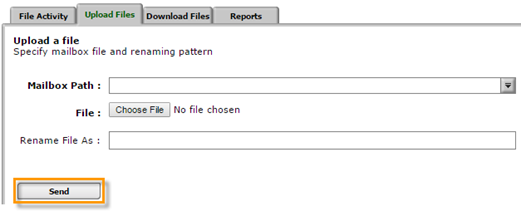
6. Complete each field and then click Send. The system will confirm your upload. Your file should process within 30 minutes or less depending on the file size. See field descriptions in the table below.
| Field | Description |
|---|---|
| Mailbox Path | Select the following root path: /Inbox |
| File | Click Choose File and select your file from where it is saved on your computer. |
| Rename File As | Use the following name conventions for all files:
ACCTCODE.CUSTID.CP00001.DDMMYYYY.HHMMSSSSS Note:
|
6. To view the status of your submitted file and to download a response file, select the Download Files tab.
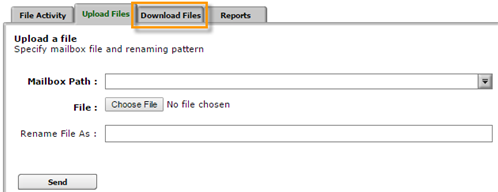
7. The Download Files tab displays each file you’ve uploaded as well as the response file (Vendor Import File). Once the Vendor Import file displays, click it to download it as an Excel Spreadsheet. The response file will have the following name convention: VENDIMP.USERID.YYYYMMDDHHMMSSSSS. The Vendor Import file contains each vendor you uploaded and their status. Each vendor will display in P (pending) status, identifying that they have been received and our teams are actively campaigning to them.

Enroll Vendors Using Vendor Enrollment Web Services (VEWS)
Comdata also offers the ability to enroll vendors using a web service platform. The benefit of VEWs is that you can use your own systems to send web service requests to Comdata and our systems will process the request and send you an immediate response. VEWS offers two request operations for enrolling vendors:
- Add Vendors for Campaign. This function is used to add vendors for Comdata to campaign virtual payments as a preferred payment method.
- Add Vendor Invoices for Campaign. This operation is used to add vendor invoices for Comdata to campaign virtual payments as a preferred payment method.
Contact your Comdata Representative for more information and how to set your account up for VEWS.
Enroll Vendors Using Comdata’s Export Sync Tool
Comdata offers Spend Escalator™ which aims to help you simplify and automate your continuous vendor enrollment with Comdata. With Spend Escalator™, Comdata’s systems can automatically pull your vendor data directly from your Enterprise Resource Planning (ERP) system and populate it within our systems. Comdata’s Vendor Enrollment team will then campaign to any vendor who is actively receiving payments other than virtual cards, such as checks. The Vendor Enrollment team will use the pending payment as leverage and offer immediate payment via virtual card if the vendor agrees to enroll.
This feature removes the need for heavy IT intervention in ERP integration and to send us your vendor information. Furthermore, if you use a Windows operating system, you can set the export sync tool to perform exports on a schedule of your choosing through the windows task scheduler.
Additional benefits include:
- Sustained, constant flow of vendor data directly from your ERP system.
- Automated continuous vendor enrollment which will increase your spend and revenue.
- Added ability for Comdata to focus vendor enrollment on only vendors that are currently being paid, which prevents us from campaigning to vendors you no longer do business with.
- Removed need to constantly send in updated vendor master records.
- Added opportunity to enroll up 72% more vendors and convert an average of 76% more spend to virtual cards.
Your Comdata Technical Services Specialist (TSS) will help you set up your systems for Spend Escalator. Also, note that TSSs can set the Export Sync Tool to pull your vendor data by a start date of your choosing.
- Exclusion rules allow you to exclude any vendors with a specific value. For example, if you want to exclude vendors that have a vendor type of employee, you can set the tool to remove those vendors.
- Transformation rules allow you to replace a value in a vendor record with another value. For example, if Joe’s Flowers is entered as the Vendor Name, you can set the system to replace that text with Joseph’s Flowers.
Contact your Comdata TSS to set up filter rules.