Follow the steps below to gather the information needed to complete the setup process.

  • Step 1. Gather Telematics Provider Information
    For Geotab and Geotab resellers, devices need to be under the Geotab Pro/Pro Plus plan to get status data such as fuel level.

  • Step 1a. Add a New User
    Log in to myGeotab and navigate to Administration > Users, and then click the Add Button. On the New User page, complete the following:

    • User (Email): Use the following convention to enter the new user email:service-CompanyName@fleetcor.com (e.g., service-USDOT@fleetcor.com)
    • Password: Create a strong password.
    • Force password: Toggle to No.
    • Security Clearance: Select View Only.
    • Data access: Select Everything.
    • Click Save.
  • Step 1b. Provide Device Report and Tank Capacity
    Within myGeotab, navigate to View and Setup Devices.

    • Download the Vehicle Device Report.
      This process may take a while, depending on how many vehicles you have. Open the report and enable editing in Excel.
    • Display the Hidden Data Sheet in the Report
      Unhiding the datasheet allows you to see the Geotab Device ID for each of your devices in column B.
      Note: To Unhide the Device ID within Excel, right-click on the Report Sheet in the lower-left corner of the screen and select Unhide. In the dialogue box, select Data and click OK. A sheet named “Data” will appear to the left of the Report Sheet.
    • Modify the Data Sheet
      Click on the datasheet. In this report, remove all columns except for Device Name, Device ID, and Device VIN. Referencing the article below, we assume the “Device Name” column is the same as our unit/vehicle numbers; thus, we are looking for unit L10834 in our system to map GeoTab device b872.
      Note: To remove columns, select one or more table rows or table columns that you want to delete. You can also just select one or more cells in the table rows or table columns that you want to delete. On the Home tab, in the Cells group, click the arrow next to Delete, and then click Delete Table Rows or Delete Table Columns.
    • Now, add a fourth column for the Tank Capacity.
      You’ll need to reach out to your maintenance team or Asset department to provide the tank capacity for each vehicle/unit.
    • Save & Email this updated report to your Account Manager.
      The account manager can upload your data into the system, so you’re able to map your device to its unit.
  • Step 2: Create your Profile in ICD. Use the instructions in the setup guide to complete this process. During this process, be sure to select GEOTABPOLL for the partner name.

  • Step 3: Map Device to Unit. Use the instructions in the setup guide to complete this process. During this process, you may want to reference the Vehicle Device Report from step 1b.

    Note: Geotab Device IDs are case sensitive.

Mapping to your Geotab Device

When pulling the Vehicle Device Report, keep it handy because when you are mapping your device ID to its unit in ICD, you may need to reference the individual fields.

Typically, the Device Name (Column A) is equivalent to the Unit ID in our system. We find it saves time mapping if you also include the VIN.

For example, you can see how the data is populated in the Unassigned Devices area.
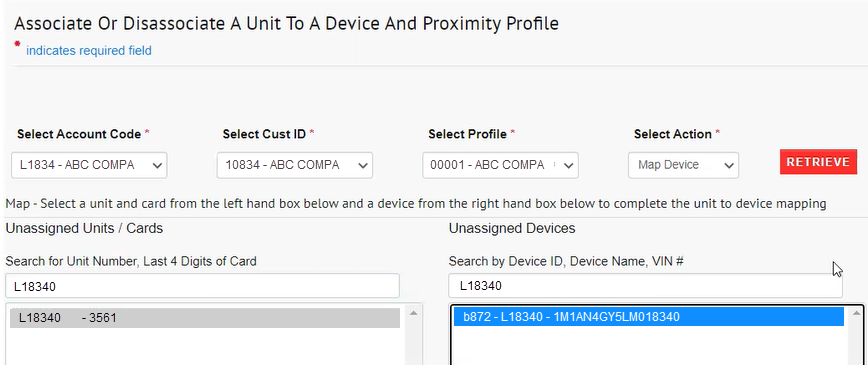
Your spreadsheet data shows:

Here, we are looking for unit L10834 in our system to map Geotab device b872. Referencing your Vehicle Device Report while mapping can significantly speed up the process, as well as providing your VIN.

How useful was this topic?

Click on a star to rate it!

We are sorry that this page was not useful for you!

Let us improve this page!

Tell us how we can improve this page?