
Now that you have your profiles set up and devices mapped, it’s time to view the alerts. The information on this page will help you with reading the alert table.
1. Select Telematics / Proximity Alerts from the main menu, and the Telematics / Proximity Alerts page displays. Use the FILTER BY drop-downs to customize the display of Alerts. After setting up the filters, click Submit.
- Status – ALL Acceptable, Unacceptable
- Account Code – ALL Account Codes or select an Account Code
When first navigating to this page, the ICD user’s default Account Code will be displayed here. - Cust ID – ALL Cust IDs or select a Cust ID
When first navigating to this page, the ICD user’s default CustID will be displayed here. - Reason Code – ALL or select a specific Reason Code

2. The Alerts are returned based on your filter selections. Once results are displayed, the user can use the Download button to export the results returned in excel format.

The screenshot is a small snippet of the larger set of details returned for each evaluated transaction. Click each tab below to understand the columns in each section.

Included in the Transaction Details section are the following details:
- Merchant Details including Truck Stop Code or Merchant ID
- Network (Proprietary or Mastercard)
- Account Code
- Cust ID
- The last 4 of Card swiped
- Unit
- The timestamp of Transaction (In CST)
- Profile Description
Note: This is the profile name at the time of the transaction
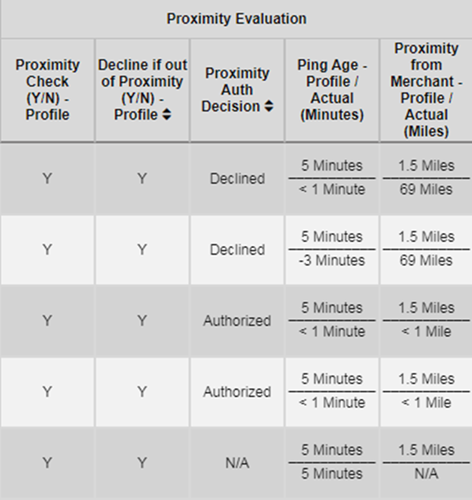
Included in the Proximity Evaluation section are the following details:
- Proximity Check – Profile
- Designates whether checking for proximity was turned on at the time of the transaction
- Decline if out of Proximity – Profile
- Designates whether the proximity profile assigned at the time of the transaction was set to decline if the calculated proximity from the merchant is greater than the acceptable proximity set on the profile
- Proximity Auth Decision
- The value will be Authorized, Declined, or N/A. This is specific to the proximity evaluation. Note: Authorized does not mean acceptable. It could be out of proximity, but “Decline if out of proximity” is N.
- Ping Age – Profile / Actual (Minutes)
- The top number provides the acceptable ping age stated in the profile.
- The bottom number provides the ping’s calculated age in the evaluation compared to the transaction timestamp.
- Proximity from Merchant Profile / Actual (Miles)
- The top number provides the acceptable distance stated in the profile.
- The bottom number provides the merchant’s calculated distance between last ping and merchant lat / long on record for the merchant location.

Included in the Fuel Evaluation section are the following details:
- Fuel Check (Y/N) – Profile
- Designates whether checking for fuel level was turned on at the time of the transaction.
- Decline for fuel level (Y/N) – Profile
- Designates whether the profile assigned at the transaction time was set to decline if the unit’s fuel level was greater than the acceptable level set in the profile.
- Fuel Level Auth Decision
- The value will be Authorized, Declined, or N/A. This is specific to the fuel level evaluation. Note: Authorized does not mean acceptable. It could be attempting to fuel above acceptable fuel level, but “Decline for fuel level is N”.
- Fuel Level Restrict – Profile
- Will be set to Y or N. Based on the profile, our authorization response is sent with a restricted number of gallons.
- Fuel Level Ping Age – Profile / Actual (Minutes)
- The top number provides the acceptable fuel ping age stated in the profile.
- The bottom number provides the calculated age of the fuel level ping or pings used in the evaluation compared to the transaction timestamp.
- Fuel Level % – Profile / Actual
- The top number provides an acceptable fuel level %. Remember acceptable would be if the actual fuel level % is equal to or less than the profile value)
- The bottom number provides the actual calculated fuel level percentage currently in the truck-based upon the average of up to the last three fuel tank level readings (number of readings used in the average depends on which of the last three level readings has a reading less than or equal to the “fuel level ping age” set in the profile)
- Tank Capacity
- Value is derived from the FUEL Screen 3 – already known tank capacity of the unit being filled.
- Fuel Amount Authorized
- The value will be a number equal to the number of gallons authorized or N/A. This is specific to the fuel level evaluation. Note: The amount here is just the number of gallons authorized, not the amount ultimately placed in the vehicle

Included in the Status Section are the following details:
- Acceptable / Unacceptable
- Defines if the aforementioned evaluations (proximity and tank level) were all acceptable or unacceptable. If either was deemed unacceptable, it will show here (does not mean the transaction was declined).
- Reason Code
- This will list as successful if all evaluations were “acceptable”. If any evaluation is deemed unacceptable, the reason or reasons will display here. Note: In a “decline” profile scenario, only one reason code should appear, since as soon as it is found, the transaction will cease.
- Evaluation Decision (Authorized / Restricted / Declined)
- Will define the final decision that comes out of the proximity and fuel level section of the authorization request.
Note the following:- A transaction may show here as authorized but still be unacceptable if the profile was not set to decline for proximity or fuel level.
- A transaction may show in this column as “Authorized,” but the ultimate transaction may still be declined elsewhere (i.e., IRIS).
- The three-dot button enables the user to block a card directly from this screen. A separate and distinct block reason code has been created.
- Will define the final decision that comes out of the proximity and fuel level section of the authorization request.